

What is Microsoft Dataverse?
In essence, to create tables in Dataverse, you need some historical references. Microsoft Dataverse, formerly known as Common Data Service (CDS), is a cloud-based data storage and management platform developed by Microsoft. It is an integral part of the Microsoft Power Platform, which also includes Power Apps, Power Automate, and Power BI.
Therefore, this database provides a unified and secure environment for storing, integrating, and managing data from various sources within the Microsoft ecosystem. It serves as a central repository where organizations can store and organize their business data, enabling seamless collaboration and integration across different applications and services.
Undeniably, Dataverse offers robust data integration capabilities, allowing users to connect and import data from a wide range of sources, including external systems, databases, and cloud-based services. This enables organizations to bring together data from disparate sources and create a unified view of their business information.
Undoubtedly, one of the key advantages of Microsft Dataverse is its tight integration with other Microsoft tools and services. Users can easily build and deploy custom business applications using Power Apps, leverage Power Automate for workflow automation and create interactive dashboards and report with Power BI all interact with each other.
In order to provide security, governance features and compliance database is the best tools to use. It allows administrators to define access controls, permissions, and data-sharing policies, ensuring that data remains secure and accessible only to authorized individuals.
Type of Microsoft Dataverse table
There are three kinds of tables for construction: Default, Managed, and Custom:
- Default Tables: These are the predefined tables provided by Dataverse. In detail, they have predefined structures and properties, such as the “Account” entity table for storing information about customer accounts.
- Custom Tables: created by users according to their specific needs. In brief, users can define the structure, columns, and relationships of these tables based on application requirements.
- Managed Tables: created and managed by the system. They have additional features that facilitate administration and maintenance, such as the ability to track data changes and manage record lifecycles.
Step-by-step create a new Custom Dataverse table:
Step-1 Add new Dataverse table:
If the table already exists in the default tables listed in the summary section of this module.
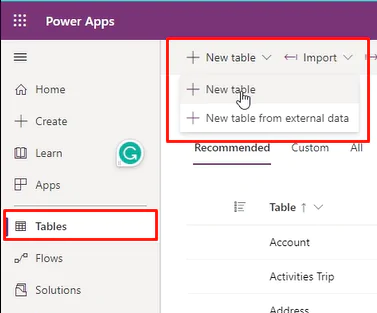
- Select Tables (Dataverse/Data) in the panel on the left-hand side of the Power Apps Portal to expand the available choices.
- Select Tables under the Data options on the left-hand side of the portal.
- In the navigation pane, select or tap on Data to expand it, then select or tap on Tables.
- Select the New table on the command bar.
- In the “New table” pane, enter the name of your new custom table in the “Display name” box. In short, the plural display name is automatically filled but can be changed and used to interact with the table in Power Apps or Power Automate.
Step-2 Adding properties to Dataverse table:
- In the “New table” pane, enter the name of your new custom table in the “Display name” box. The plural display name is automatically filled but can be changed. This name is used to interact with the table in Power Apps or Power Automate.
- The “Name” field is automatically filled if the display name is entered. The prefix ensures compatibility when exporting and importing tables between different environments. You can change the table name, but not modify it after saving the table. In our example its name is Patient.
- Next step if you want to add attached fields check this box.
- Expand Advanced options. This is necessaire for one post to explain each option. What you need to know at this moment. In view of you can import the table as part of a management solution and any user with appropriate privileges can customize these tables. Check our post to see more details about the advanced table.
- Colour options are if you want to personalize colours for each table in your model.
- On one hand, don’t save after completing the next step.
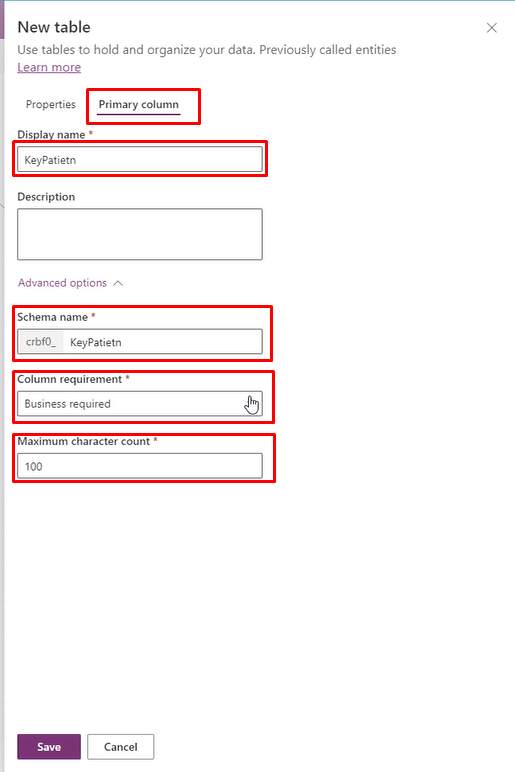
In the “Primary Name” column, enter a name for the “Display name”. In the “Name” box, replace “Name” with a name of your choice.

Step-3 primary column.
On the top of the new table window, there are two pages: the properties described above and the primary column. select the last page.
When you create a table one column is automatically created. You can use this column and personalize your type and more.
In view of that primary column doesn’t have value and I personally use it to create a Key column or ID column for this table.
Given these points, we will name de column and in the next topic, it will be changed to key column.
- In the “Primary Name” column, enter a name for the “Display name”. In the “Name” box, replace “Name” with a name of your choice.
- To clarify, each table has a “Primary Name” column used for searching and establishing relationships with other tables. Typically, this column stores the name description of the data in the table row. Whenever the principal name can’t be updated during table creation, but not after creation.
- The schema name is a system name column with a prefix table
- Column Required. Defining is a column is required or optional
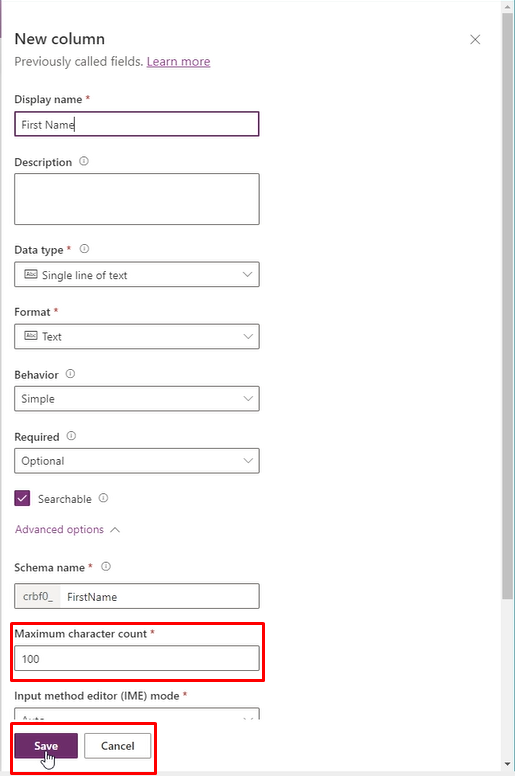
- Maximum character count. If you are starting to create a table on the database take special attention to this field. Defining the size of the field is particularly important when you are working with text data, such as names, addresses, or descriptions. you can ensure that the data is collected in the preferred format and that the value of each property is as expected, this helps to avoid errors and inconsistencies in your data.
However, it is also important to consider the memory usage of your database when defining the size of your columns. If you design VARCHAR columns much larger than the greatest size you need, you will consume more memory than you have to. - So, select Save table to save and make the table available for use in applications.
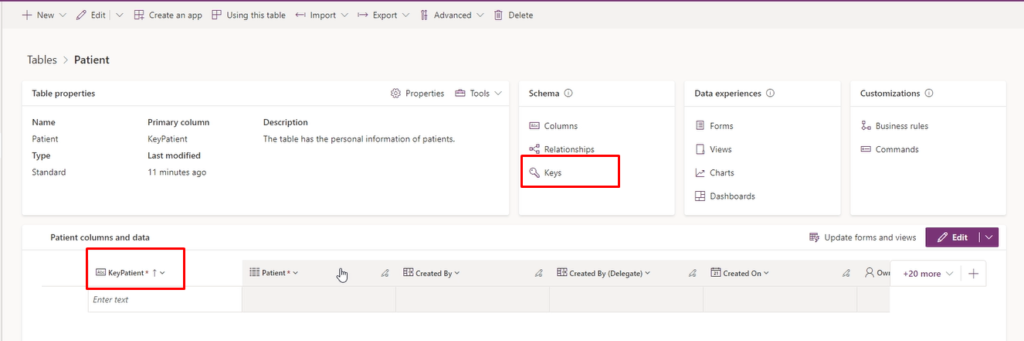
Note: All tables have read-only system columns. Equally important is that the system columns are not shown. In the same fashion, to display all columns, change the filter on the command bar from Default to All.
Properties of the column in Microsoft Dataverse
Types of columns and your properties
The column type determines what kind of values are in that column. They include:
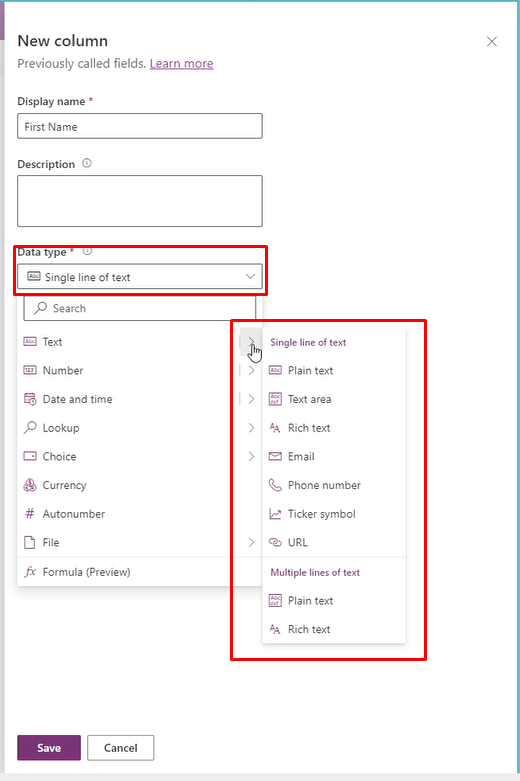
- Text: There are three basic types:
a) The “Single Line of Text” column and the “Multiple Lines of Text” column have the same defaults, with a maximum value of 100 characters.
b)The “Multiple Lines of Text” column also has a maximum value of 4000 characters.
c) Multi-line text columns have a default limit of 150 characters but can support over a million characters when you need to include large amounts of text.
Text columns allow you to select either Plain Text or Rich Text formatting.
Additionally, Single Lines of text columns can be designated, some of which do not require comments. Such as: - Email, Phone Number, Yes/No, Currency, Time Zone, Date and Time, URL in its respective formats.
- Action Symbol: a text value for an action symbol that will display a link that opens to show a quote related to the action symbol.
- Number: allows formatting the data uniquely as numbers. They are also designed as:
a)Integer: a numeric value displayed in a text box as a whole number.
b)Decimal: a decimal value with up to 10 points of precision. For more information, see Using the Right Number Type.
c) Floating Point: a floating-point number with up to five points of precision. - Language Code: a numeric value for a language in the environment, which is the Locale ID (LCID).
- Duration: an integer value that represents an amount of time. Numbers are processed in seconds.
- Date Only: a date and time value that displays only a date.
- Lookup: creates a reference to a single row for a target row type.
- Customer: a lookup column that can specify a customer or a code assigned to it.
- Option Set: allows creating a list and selecting one or more options, which can be custom lists or system-generated templates.
- Auto-Number: customizing the format of these columns as desired and then waiting for the system to generate the corresponding values that automatically populate at runtime.
- File: The default size is 32 MB, with a maximum of 131 MB.
- Image: displays a single image, with a minimum size of 1 KB and a maximum of 30,720 KB (as of 05/16/2023). The default value is 10,240 KB. However, in the table, the image has a maximum of 144 x 144 pixels as a “thumbnail.” I always recommend compressing this image to save space in the database.
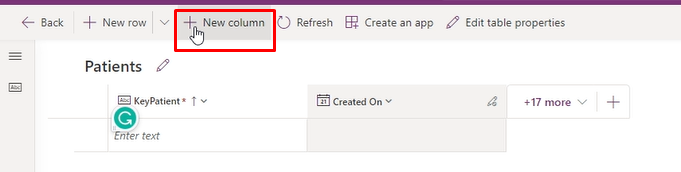
Step-01 create a new column Microsoft Dataverse
- Open an existing table or create a new one.
- Select Add column from the menu at the top of the page.
Step-02 parameters of the new column Microsoft Dataverse
- Enter the information in the following columns:
- Display name: the name shown to users.
- Name: the internal name used by your application.
- Data type: the type of data you want to store in the column.
Required: check this checkbox to ensure that this column always has a value when a user tries to add a record to this table. - Searchable: uncheck this checkbox for table columns that you don’t use. Searchable columns appear in Advanced Find and are available when you customize views. Unchecking this checkbox reduces the number of options displayed for people using Advanced Find, and makes it easier for users to create custom views without seeing unused columns. Uncheck the Searchable checkbox when working with columns in a standard or complex table that you don’t use.
- Calculated or Cumulative: use to define a calculation or an accumulated value in this column.
Description: a description of the column. - Maximum Length: use with text columns to define the maximum length of the data that a user can enter in this column. Minimum and Maximum Values: the column is available and used with numeric columns.
System Column Types Microsoft Dataverse
In addition, some columns types used by the system that you cannot add using the designer, including:
- DateTimeStamp: a BigInt type used by the system to capture a version number for update management in a table.
- Customer: This can be a unique ID or contract number.
- Note: Although it is a system column type, you can add this attribute using the designer.
- Owner: refers to the user or team assigned to a user-owned or team-owned table row.
- Status Reason: Each option associate with one of the available status options. You can add and edit the options. You can also include custom state transitions to control which status options will be available for specific tables.
- Status: a system column with options that usually correspond to active and inactive status. Some system attributes have other options, but all custom attributes have only the Active and Inactive status options.
- Unique Identifier: a system column that stores a GUID (globally unique identifier) value for each row.

Create Key Columns
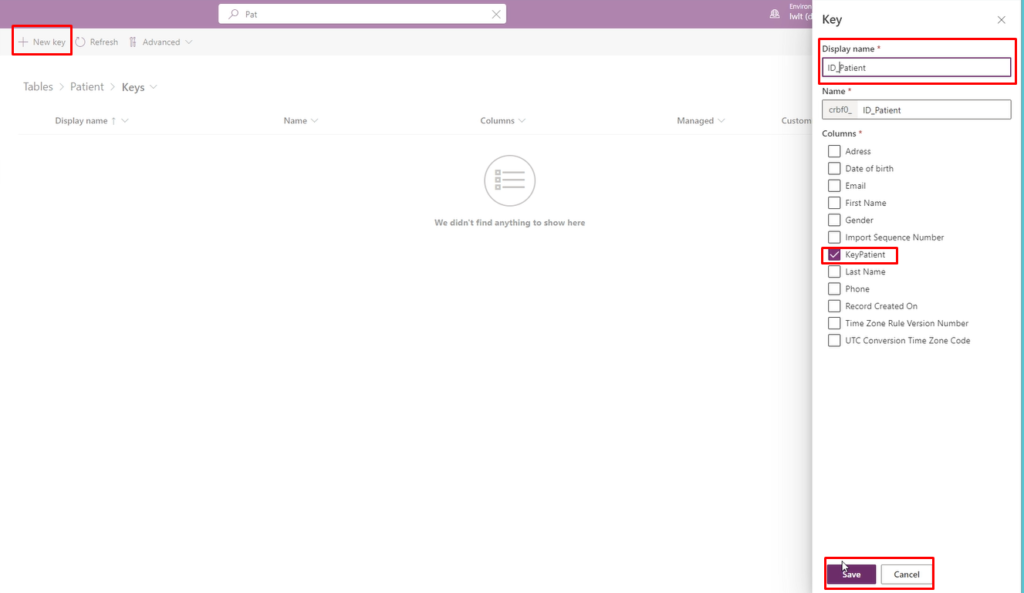
Step-01 Selecting parameter Key
- Access Power Apps and select the Dataverse > Tables menu option in the left navigation column.
- Select the table to which you want to add a new key.
- Select Keys from the options below Schema.
- Select + New key on the command bar.
Step-02 Creating parameter Key
- Select new Key
- Give a display name to the key.
- Select one or more columns that will form the new key. In our case we will select KeyPatient as Key for this table.
- Select the Save button.
Conclusion
This approach provides an overview of table creation. In future articles, we will delve into advanced properties for table and column creation in more detail. For team-level projects, tools such as Dataverse for Teams and others can be utilized to organize projects and streamline access.
It is crucial to be aware that creating tables will have an impact on the capabilities contracted by the organization. Therefore, it is of utmost importance to optimize tables to the maximum extent possible by reducing field sizes to their necessary minimum and carefully planning table structure to avoid column repetition.
Always refer to the limitations of attached file sizes and storage capacity in Dataverse. Additionally, using SharePoint as a database and for building Power Apps applications presents significant challenges in terms of security, traceability, and data logging.
